
Transfer Photos From Iphone To Mac
You want to move photos from your iPhone to your Mac and don’t know how? Then here are three simple ways to do it.
You want to move photos from your iPhone to your Mac and need a simple, easy-to-understand guide? Then you are right where you need to be. We’ll show you three quick and easy ways to add your pictures.
Airdrop Photos From An Iphone To A Mac
The easiest way is probably to use AirDrop to send the photos directly from the iPhone to the Mac. AirDrop uses both Bluetooth and Wi-Fi to connect two devices directly to each other. So you can choose specific photos and save them directly to your Mac.
Before you can use AirDrop, you should make sure that all of your devices have the latest software:
Once your devices are up to date, we can transfer your photos. And it works like this:
First, enable Bluetooth on your Mac. To do this, click the Bluetooth icon in the menu bar at the top and click the switch until it turns blue. If the icon is not available in the menu bar, click on the Apple icon in the top left, then on “System Preferences…” and on “Bluetooth”. There you click on “Activate Bluetooth” on the left.
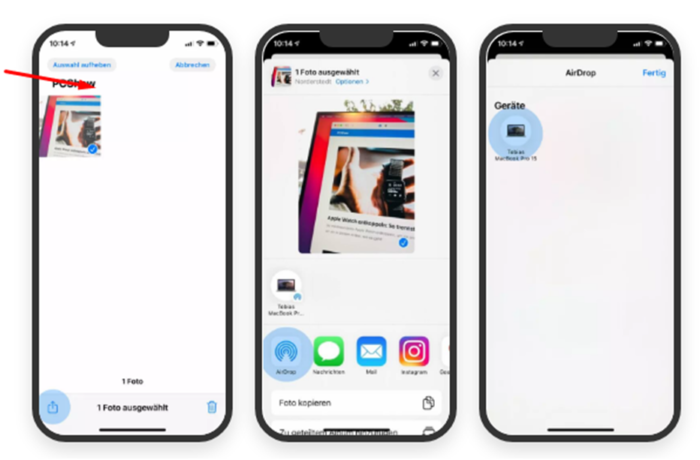
- Then open the Photos app on your iPhone.
- Click “Choose” in the top right corner and mark the photos that you would like to transfer to your Mac.
- Now press the share icon (the square box with an arrow pointing up) in the bottom left.
- Now select “AirDrop” and wait for your Mac to appear in the list. Click on the Mac and the transfer will already begin.
The Downloads folder on your Mac is where your photos are kept. AirDrop also tells you in the top right corner that the transfer is happening and gives you the option to open the folder at the same time.
You can now easily move photos from your iPhone to your Mac. iCloud is another similar choice.
Transfer Photos From Iphone To Mac Via Icloud Without Cables
You can also use iCloud instead of AirDrop to send files. The process is basically the same, but you move the photos to a folder in iCloud and then open that folder on your Mac. You’ll be surprised by how similar the steps to using AirDrop are. This is how it goes:
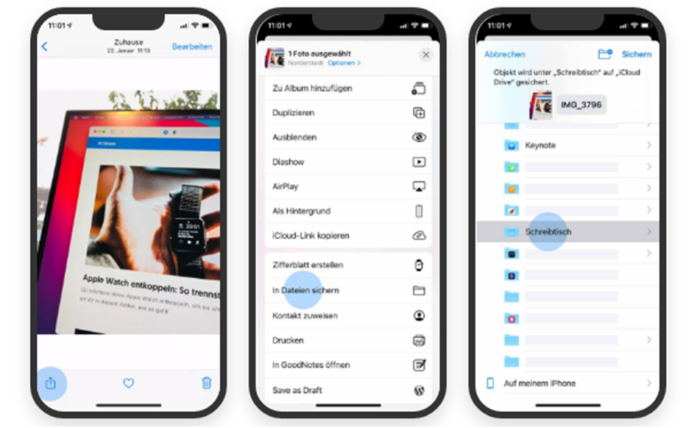
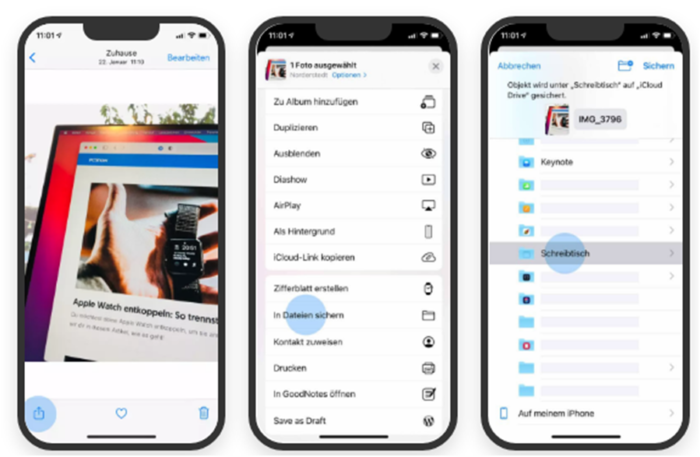
- Now, we use the iPhone’s “Photos” app again.
- Click “Choose” in the upper right corner and select the photos you want to move to your Mac.
- Now, click the square box with an arrow pointing up in the bottom left corner.
- Choose “Save to Files” next.
- Choose a folder where you want to save the photos, and then click “Save” in the upper right corner.
- Now, the pictures will be saved in this folder and sent to iCloud. After a short time, they should show up in the same folder in the Finder under “iCloud Drive.” You can also easily move photos from your iPhone to your Mac in the same way.
Automatically Transfer Pictures With The Photos App
Even though the first two ways seem simple, they still need to be done by hand. Lastly, you choose photos and move them one at a time to your Mac. So if you take new pictures, you’ll have to go through the same steps again. It would be easier if you could automatically move photos from your iPhone to your Mac, right?

That works, too.
With the iCloud Photo feature, the iPhone’s Photos app can automatically send photos to the online photo library. It means that your photos are sent straight to iCloud after you take them, and you can then access them on all of your devices. They can then be watched right on the Mac, but they can also be watched on the iPad or Apple TV.
- And here’s how to start using iCloud Photos:
- First, open the iPhone’s Settings app.
- Scroll down and click on “Photos.”
- Now, make sure the “iCloud Photos” item is turned on. For this to work, the slider must light up green.
Now that you’ve turned on the feature, your photos will be sent to iCloud.
Here’s another piece of advice: If you have iCloud photos turned on, you can also choose whether or not your photos are uploaded when you aren’t at home and don’t have WiFi. Then your iPhone connects to the mobile network and uses up data volume. Follow these steps if you only want to send photos over the WLAN:

- First, open the iPhone’s Settings app.
- Scroll down and click on “Photos.”
- Click on “Mobile Data” now.
- Click on the slider next to “Mobile data” to turn it off. If it worked, this is grey.
Transfer Photos From Iphone To Mac Not Working
But sometimes there is a problem and you can’t move photos from your iPhone to your Mac. Several things could be going on if this is the case. We’ve put together a list of common answers for you:
Bluetooth must be turned on on both the iPhone and the Mac if you want to use AirDrop to send photos.
Set Visibility: When you AirDrop, your Mac doesn’t show up on your iPhone? Then, on a Mac, open Finder and click on AirDrop on the left. At the bottom, click “I’m visible to:” and choose “Everyone.” You should change the item back to “Contact Only” or “Nobody” after the transfer. If you don’t, you’ll also be shown to people nearby. (They can’t just send you photos, though, so don’t worry.)
You want to transfer photos through iCloud, but they don’t show up on your Mac? Then it’s usually the connection to the internet. To stop the Internet, you should turn off your WLAN or pull the LAN plug. Wait a minute, then turn it on again. Then, iCloud will automatically start the transfer again. The Photos app is the same. If the photos don’t show up on the Mac, it’s usually because of how well the Mac is connected to the Internet. Turn off the WiFi or unplug the LAN cable, wait a minute, and then turn it back on.
Our conclusion
We hope that you were able to move photos from your iPhone to your Mac and found the best way for you to do it. The easiest way for us is for the Photos app to do the transfer for us. If you don’t have any free space on iCloud, you can use direct AirDrop transfer instead. It’s easy and free. Still have questions about transferring photos from your iPhone to your Mac? Then tell us in the comments below.


