
Create A Screen Recording On The Macbook
Do you want to record a video of your MacBook screen while talking? So, you should read this article.
Do you want to record what you’re doing with the mouse on a MacBook with sound? Then, it makes sense to be honest about what you’re up to in the here and now. On a Mac, you can accomplish all of this with a few keystrokes. Read this article to learn how everything functions.
Make Simple Macbook Screen Recording With Sound
If you want to demonstrate a procedure, filming a little clip of it is an easy and effective option. It doesn’t appear very professional to start filming your MacBook screen with an iPhone, and you’ll need one of your hands free at all times if you plan to continue doing so. Thankfully, the MacBook includes a built-in screen recording feature, making the process considerably simpler.
To begin recording, simply press “Command” + “Shift” + “5”; however, audio cannot be captured during this process. Mac users can use QuickTime Player to capture their screen and microphone input.
Start Screen Recording On Macbook With Quicktime Player
- Apple’s “QuickTime Player” is pre-installed on the MacBook, and it may be used to initiate a screen recording with audio. This is how it operates:
- If you type e.g. B into QuickTime Player, the file will open. To access QuickTime Player, use the Command key plus the space bar. Press Enter to confirm.
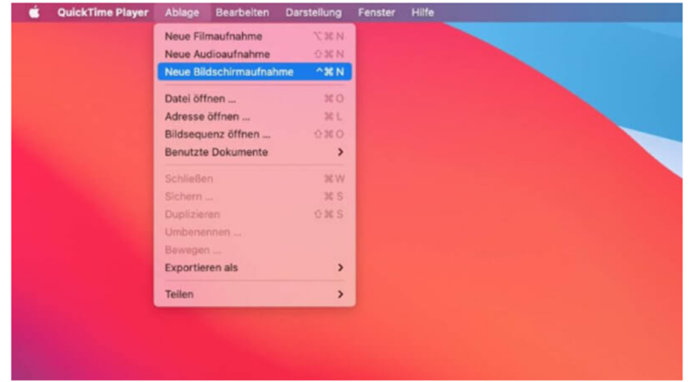
- You can start a new screencast by going to “File” in QuickTime Player and then “New Screen Recording.”
- Now, the recording bar looks like the one you’d get by pressing “Command” + “Shift” + “5” to record your screen, except that you can use the microphone with it now too.
Change Settings And Turn On Sound
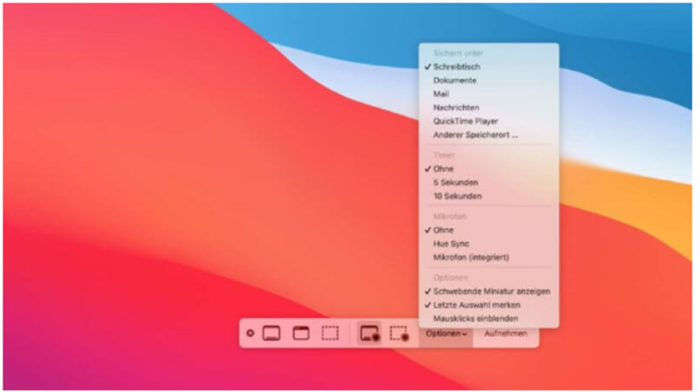
With the addition of the “Settings” button to the menu bar, it is now simple to access the various configuration options for a screen recording on a MacBook.
Select Storage Location
As a first step, you can choose a destination on your computer to store the recording. The desktop is preconfigured for this purpose, making it easy to locate the movie should you need to do so in the future. Here you have the option of changing the current storage facility.
Activate Timer
In addition, a timer option is available. This is useful if you need to do something before the recording begins (such B. position the mouse) but you still want to start the recording. The option to delay the game’s beginning by 5 or 10 seconds is also available.
Enable Screen Recording With Sound
When you first open the Microphone menu, you’ll notice that the volume is set to zero. A drop-down menu allows you to choose which microphone you’d want to use. In almost all circumstances, this will be set to “Microphone (built-in)” to make use of the Mac’s internal microphone.
Make Further Settings
In addition, you have the ability to adjust many settings. When the recording is complete, for instance, a thumbnail of it will appear in the Mac’s lower-right corner. You can hide the floating thumbnail by deselecting the “Show floating thumbnail” option. Turn on “Remember last selection” if you want to save your preferences and use them for future recordings. When you record, do you want your mouse pointer to be visible? To reveal the mouse pointer, select that option.
Record Entire Screen
With a single click, you may record your full display. A small camera will then appear, with which you simply click on the screen. Once you press play, the recording will begin.
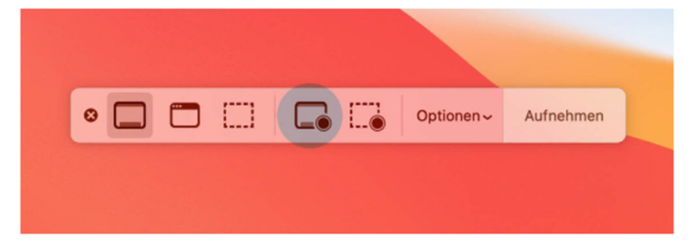
If you have an external monitor hooked up to your MacBook, you can choose to record from either the internal or external display.
Capture A Portion Of The Screen
Choose the icon to record only a certain area of the screen.
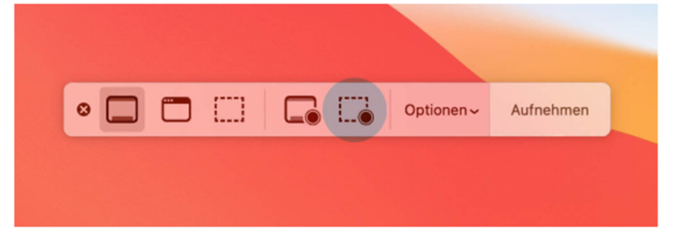
After that, create a rectangle around the area to be recorded. Activate the confirm button by pressing Enter. After that, we begin recording.
Trim, Share And Backup Screen Recording
A preview of your recorded video will play for a few seconds in the Mac’s lower right corner once you’ve stopped recording. Just select the preview image to listen to the file you’ve made.
To shorten your video, go to the timeline and select the scissors icon. A “share” button allows you to easily send the clip to loved ones.
Our conclusion
Using the built-in QuickTime player is the simplest way to capture an audio-enabled screencast on a MacBook. With the right configuration, making a video recording is a breeze.


