
Sometime, while using the computer, you may get some problem which you can’t solve yourself. So, you need to take help from any other computer engineer. But taking the full system to the computer expert isn’t a great idea as there is TightVNC software available which allow the third person to access your computer by setting in the next room or any other place.
So, whether you want to give access of your computer screen to your friends or any computer expert to resolve the issue or to show them anything, you can simply use this TightVNC app on your Windows 10, 8, 7, XP. The TightVNC works as a remote control app which contents the mouse and keywords of a third person’s system once they connect through the TightVNC. It mostly used for distance learning on IT companies. So, TightVNC is the best option which reduces your expense and saves your time. If you new and wondering how to use TightVNC on Windows PC, then here we have come to show you the full tutorial.
How Download & Install TightVNC 2.8.23-64bit On Windows 10 PC
As MSI-package TightVNC is straightforward to install with the help of standard Windows installer. Only you need to confirm your package to download on current Windows 32-bit or 64-bit.
Step #1. Click on the link to download the TightVNC software on your Windows. Once it downloads, you will get the setup file name “TightVNC-2.8.23-GPL-setup-64bit.”
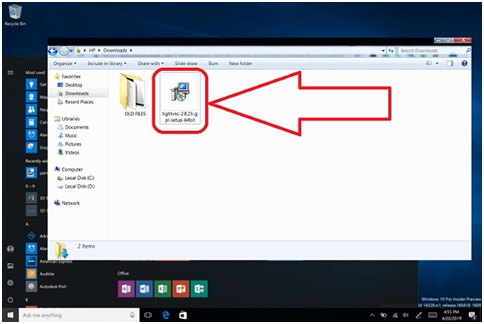
Step #2. Double click on window installer package file to install it.
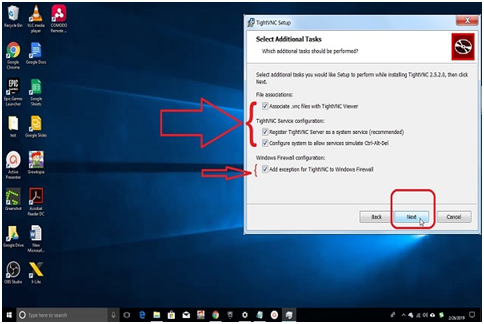
Note: TightVNC is itself a server which runs in the background, so it does not need any VNC server to install. It likewise naturally enables you to utilize an alternate firewall in the Windows firewall, ensure the firewall doesn’t square TightVNC or you can’t connect.
Step #3. Now enter your secure password that it cannot be a hack or guess by anyone.

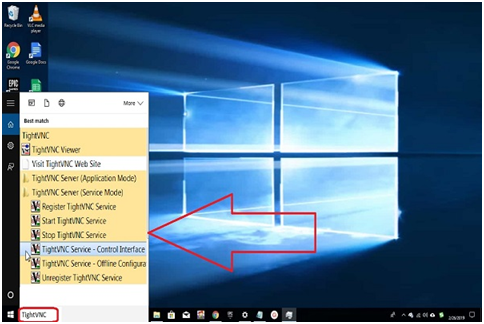
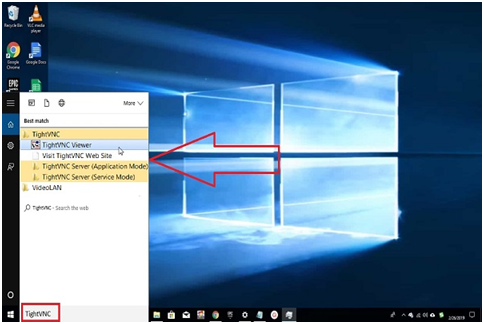
Step #4. When the installation completed, click on the start button from your windows and search for TightVNC to configure your server using the option control Interface. TightVNC will be running at the background of your system.
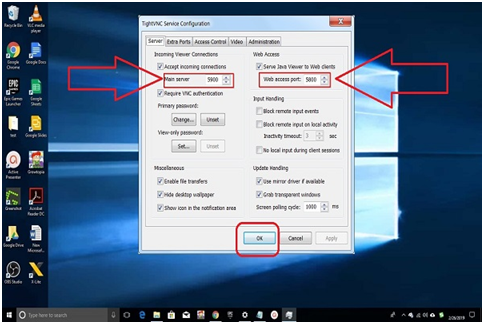
Step #5. Change the ports TightVNC users by increasing the default port 5900 to upper for security purpose. It is essential because most of the time, people try to search for an open default port to connect with your PC without your permission or inform. Also, check the tick mention in the screenshot same as you do before click on “OK” button.
Now your computer is running VNC server at the background so that you can set up Dynamic DNS and forward ports. It will help you connect you to the internet.
Step #6. Transfer the port of the VNC server to your router. On each router, this method is distinct, but you will have to use the internet interface of your router to forward ports.
Note: Web access suppliers frequently change the IP address doled out to home systems, implying that if your home IP address transforms, you will most likely be unable to associate with your home PC.
How To Use VNC Remote Computer On Windows 10 With Tight VNC
You can use a VNC client to link to another computer with a VNC server operating on the remote computer. TightVNC involves a VNC client that allows you to install TightVNC on another desktop and delete the server choice to install the viewer only.
Step #1. You will discover the TightVNC Viewer in your Start menu once it is installed.
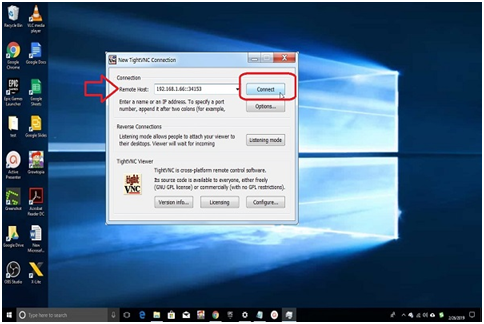
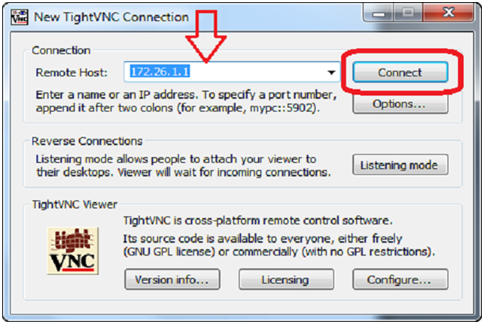
Step #2. This step has some details, so be careful and do as said. Enter home computer address to connect or computer local IP address (for same local network), home network IP (For accessing the computer over the internet), Dynamic DNS hostname (Setup DNS dynamic to access a computer over the internet).
If you want more details related to Step #2, then comment on us.
In case using a different port to run VNC server, we also suggest the same. To do so use the port number as mention in the screenshot as example.
Step #3. Once TightVNC is connected, you will see on your window screen the remote computer desktop as shown in the screenshot.
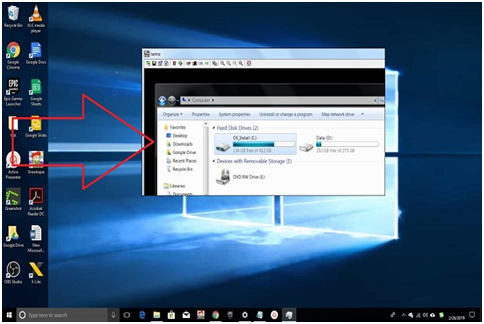
Now you are connected with the Tight VNC and enjoy this primary function to run remotely from one system to another system.
If you are using the Linux operating system and want to run TightVNC on it, then follow the step guide. It will allow you to run TightVNC on Linux, also share how it works on Linux in the comment box.
How To Use TightVNC On Linux
If you have already downloaded and install TightVNC then go for steps, otherwise, open the TightVNC (http://www.tightvnc.com/) link in a web browser and install it on your Laptop/PC.
Step #1.
Connect your Laptop/PC to the network that allows you to access your Robotino ®.
Step #2. Begin TightVNC and enter the IP address of your Robotino in the Host Name field in the arrangement exchange box.
Step #3. The Robotino® remote work area shows up. An aggregate of four work areas can get to by right-clicking with the mouse.
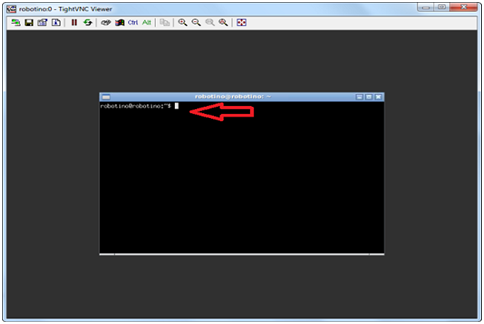
Step #4. Open the context menu of the desktop by right-clicking any empty area and executing the Robotino View direction.
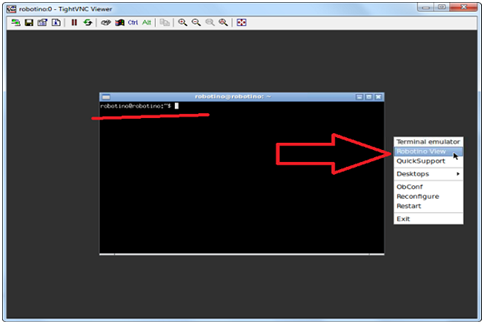
Step #5.On the remote desktop, Robotino View begun. It is then possible to open any current program or create a new application.
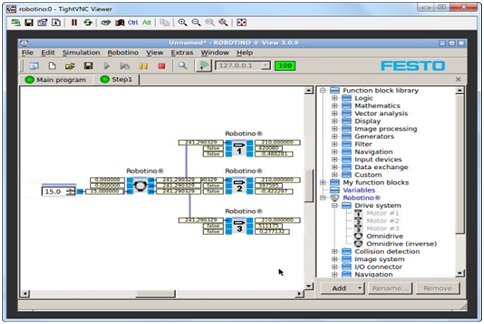
Step #6.
To build up an association between Robotino View and the robot controller, enter the substantial IP address of the Robotino® or the IP address 127.0.0.1 for a nearby association. When the association has been set up, you can begin the program in Robotino.
If you are looking for the TightVNC alternative, then check out the RealVNC which provide the same best experience, want to know more comment us.
Final Words:
In this article, we discussed what is TightVNC, and also share my experience for using TightVNC to connect with my friend PC. It works on Windows operating system as well as the Linux operating system. We provide the Linux method; hope that you will get the best way to connect with other PC. If you want to know more or you raise any question related to the topic, then share with us through the comment box.


