
Setting Up Iphone Mail For Gmail, Outlook And Co.

If you have a Gmail, Outlook, Yahoo, AOL, or iCloud email address, setting up your mail on an iPhone is easy. The iPhone will then have an easier way to set it up. And this is how it works:
- From the Home screen, open the Settings app. You can tell them apart by the symbol of gears. Just click here.
- Scroll down and click on “Mail.”
- Now, from the list, choose “Accounts.”
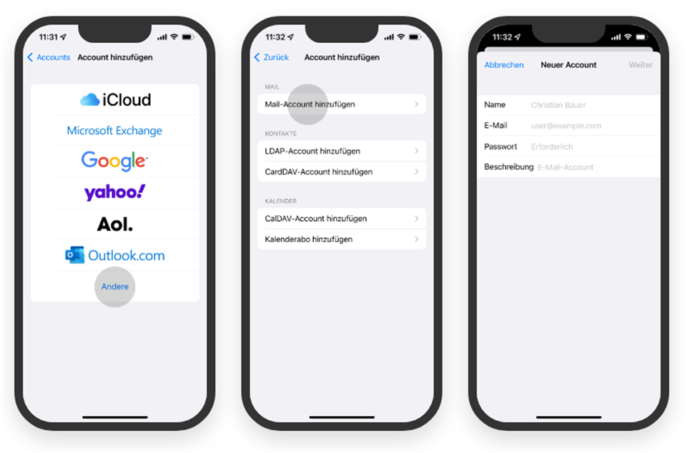
- Tap “Add Account” now.
- Choose your email provider’s logo from the list.
- Sign in and tell us about yourself.
- Your mail will now be set up on your iPhone. This could take some time. The “Mail” app should then let you see your mail.
Set Up Iphone Mail Manually
If you have a different provider that isn’t on the list, like T-Online, GMX, Web.de, or another one, you need to do two things. First, we’ll need your email provider’s login information, and then we’ll set up your email address.
Find Out Your Mail Provider’s Details
We need to take one more step before we can add your email address to your iPhone. We need your email provider’s access information so that the iPhone can get and send emails from that provider in the future.
- We have made it easy and simple for you to find the so-called server addresses. After all, who cares about the technology behind them?
- First, look in the SMTP and IMAP servers list for your email provider. Then, keep three things in mind. We’ll go through this with the mail service GMX as an example:
- your service provider (in this case: GMX customer number or GMX e-mail address)
- Address after IMAP (in this case: “imap.gmx.net”)
- The address that follows SMTP (in this case “mail.gmx.net”).
- Everything there? Good, then you’re already done with the hard part. Now, you’ll keep setting up your mail on the iPhone.
Add Mail Account On Iphone
It goes on with the iPhone. Now, just do what it says step by step:
- From the Home screen, open the Settings app. You can tell them apart by the symbol of gears. Just click here.
- Scroll down until you find “Mail,” then click on it.
- Now, click on “Accounts” and then “Add Account.”
- Now, at the bottom of the list, click “Other,” and then at the top, click “Add Mail Account.”
- Now, enter your name (which will show up as the sender), your email address, and your mail provider’s password. You can choose the one that fits best. It shows up in your email programme so you can see the big picture.
- Now, the information you wrote down in the last section comes into play. Leave the upper slider set to “IMAP.” Now fill in the fields that are still blank. For “Incoming Mail Server,” type in the Hostname, Username, and Password that you wrote down in the last step. Then do the same thing with “Outgoing Mail Server.”
- Now, click “Next” at the top and wait for the iPhone to finish checking the information.
POP3 Or IMAP – Which Should I Choose?
You once found the “IMAP” item when you were setting up. You could have also chosen POP3 there. But what exactly does that mean?
POP3: This is the standard way to get emails. Your email provider sends the messages to your device and then deletes them from their end. If you get the emails on two different devices, the emails will be downloaded to the first device, and you won’t be able to get them on the second device anymore.
IMAP :is a little different in how everything works. The emails are retrieved from the mail provider, but they stay with them. So they can be shown on other devices as well. The mails slowly fill up the storage space, which is a bad thing. So, you should make sure to delete old emails every so often.


